1. Redux 기초
내가 userObject를 component에 전달하던 방식
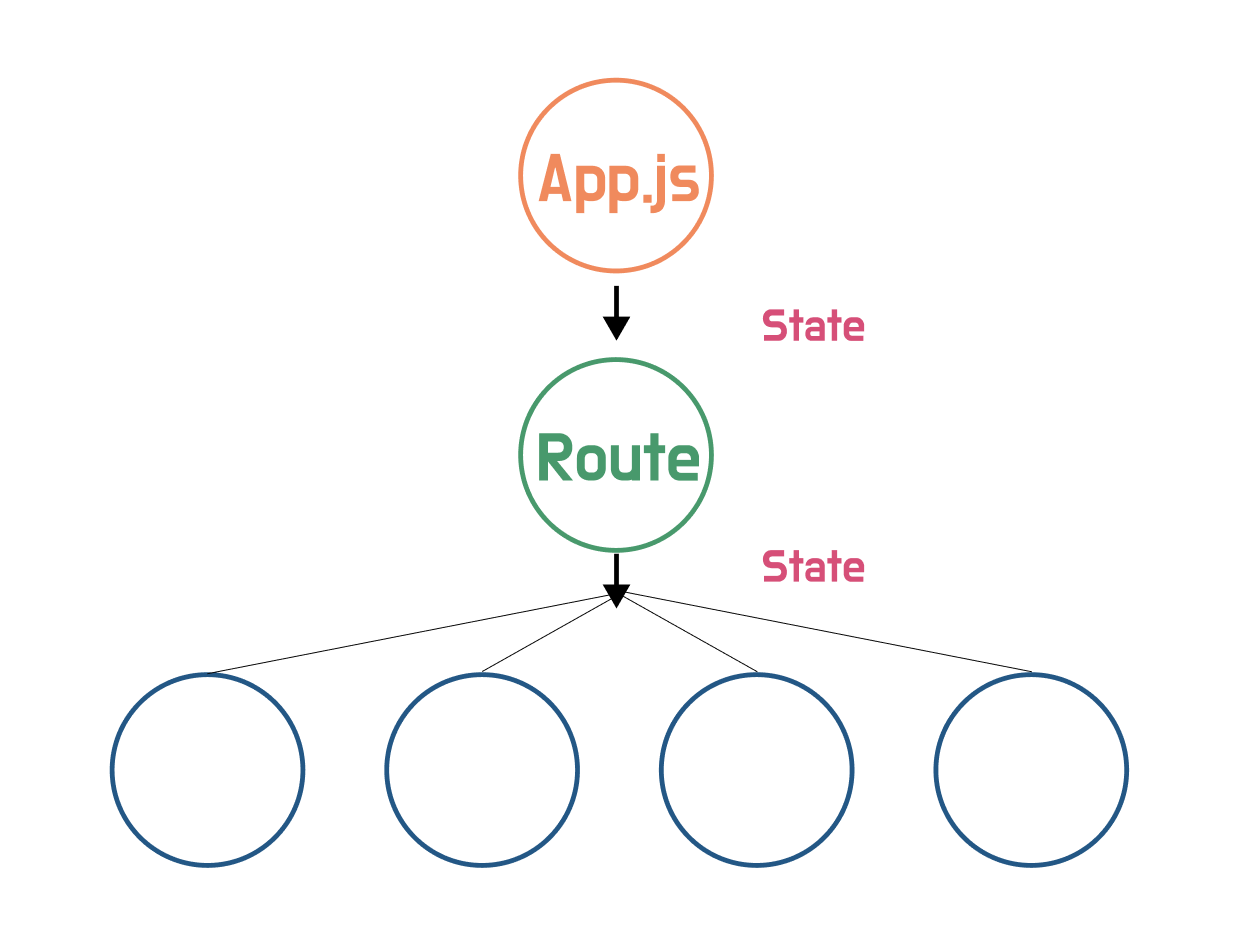
이전까지는….최상단 루트인 App.js에
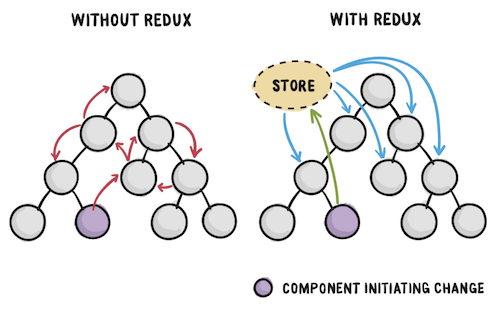
userObject를 두고, 유저 정보의 변경을 루트에서 하향식으로 각 컴포넌트에 뿌려줬다. 근데 이런 방식이 굉장히 불편하고 비효율적이라고 느껴졌다.
이에 따라, 가장 널리 알려진 상태관리 라이브러리 Redux를 통해 state들을 관리해보고자 한다.
특히, userObject를 계속 props를 통해 컴포넌트에게 뿌려주는 것이 가장 귀찮고 번거로웠다…
Redux 기본
컴포넌트 안에서만 사용되던
state를 이제store라는 곳에 담아두고 사용한다.
그리고 필요한 컴포넌트에서 해당store를 구독(subscribe)하고, 해당state가 변경되면 그state를 구독하고 있는 컴포넌트가 리렌더링 된다.
기본 로직과 컨셉

-뷰에서
Dispatch를 통해Action을 발동시킨다-그리고 해당
Store에서, 정해진reducer를 통해state를 변경한다.-해당
state(store)를 구독하고 있는 컴포넌트는 리렌더링 된다.
Redux 설치
참고로, Redux는 React를 위해서 만들어진 라이브러리가 아니다…
순수 javascript 앱을 위해 만들어진 것이기 때문에 react-redux를 통해 redux와 react를 연결시켜줘야 한다.
1 | $ npm install redux react-redux redux-logger |
Reducers
reducer는 하나의 함수다.
현재state와action오브젝트를 받고, 만약 필요하다면state를 update해준다.
🔥 불변성을 지켜야 한다.
Redux는 참조값을 기준으로
state가 업데이트 된 것인지 아닌지를 판단한다. 따라서 직접적으로state를 업데이트 하면, 참조값이 변했다는 것을 인식하지 못한다.1
2// 올바른 불변성 유지 방법
state.something = {...something, action.something}Action 생성
action은reducer를 실행시킨다.
이 중에서도type은 특정 action의 고유 주소값(이름)이라고 생각하면 된다.
그리고payload는 이 action의 실행에 필요한 어떠한 데이터다.1
2
3
4
5
6
7// Action
export const updateUserAction = 'Update_User';
// Action Creator
export const updateUser = (user) => ({
type: updateUserAction,
payload: user,
});reducer 생성
1
2
3
4
5
6
7
8
9
10
11
12
13
14
15
16const initialState = { user: { test: 'hello' } };
function updateUserReducer(state = initialState, action) {
// reducer가 이 action을 참조하는지 체크
if (action.type === updateUserAction) {
// 만약 참조한다면, state를 복사
return {
...state,
// 그리고 새로운 값을 업데이트 해준다.
user: state.user,
};
}
// 위 조건에 해당되지 않으면 그냥 기존 state값을 리턴해준다.
return state;
}
export default updateUserReducer;rootReducer 생성
위에서 생성한 개별
reducer를 하나로 합쳐줄 rootReducer를 만들어야 한다.
‼️ 근데 만약 reducer가 하나라면combineReducers를 사용해선 안된다.1
2
3
4
5
6import { combineReducers } from 'redux';
import updateUserReducer from './authentication/userUpdate';
const rootReducer = combineReducers({ updateUserReducer });
export default rootReducer;
Store 적용하기
1 | // ../src/index.js |
컴포넌트에서 redux 활용하기
이제 기본적인 세팅이 끝났으니, 각 컴포넌트에서 redux를 활용해볼 수 있다.
1 | // someComponent.jsx |
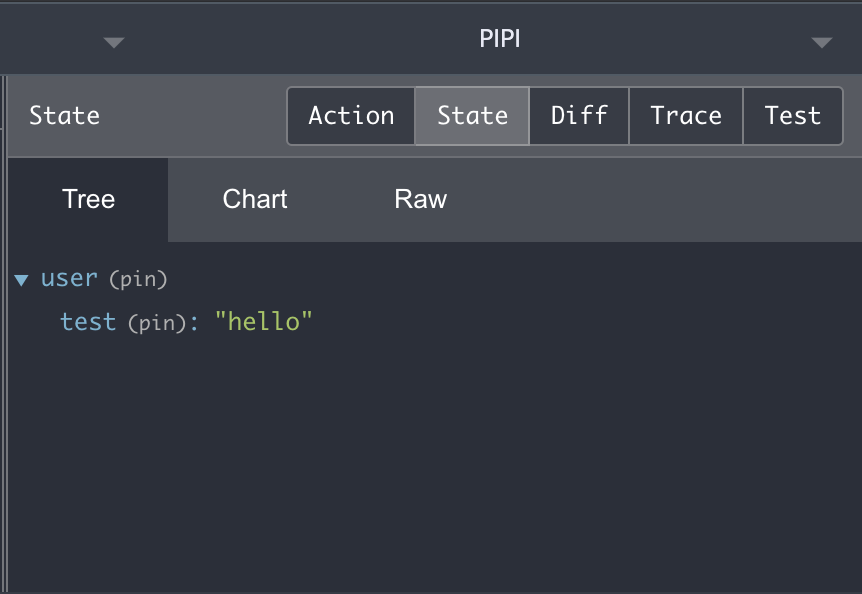
성공적으로 불러와졌다…!!
다음 포스팅에서는 이러한 redux
state를dispatch하여 변경시키는 것을 시도해보려고 한다.